
Capt. Frank Lanier
Take proper care of your boat’s electrical system.
Regular inspection of your boat’s electrical system can prevent several issues, from inoperative electronics to shock hazards and even fire. Here’s how to keep your time on the water both safer and electrically trouble-free.
Battery basics
Start your inspection of the DC system at its heart — the battery. Check all battery terminals and connectors for issues such as corrosion, loose hardware or broken wires. The use of wing nuts to secure battery cables is not recommended. A better solution is to use stainless steel Nyloc nuts instead.
Clean all battery tops and posts of corrosion with a rag dipped in a solution of water and baking soda (a couple of tablespoons to a pint of water), drying afterward with a clean rag. For severe corrosion, pull terminal connectors, brighten both the battery post and inside the connector with a wire brush, then reinstall and spray with a good marine corrosion inhibitor.
Check the electrolyte levels of wet cell batteries and top off low cells with distilled water.
To accurately test your battery, allow it to charge overnight, disconnect the terminal lugs, let the battery sit for 12 hours, and then check its voltage. Wet cell batteries should read 12.6 volts or greater, while fully charged gel-cell and Absorbed Glass Matt (AGM) batteries should read slightly higher at 12.8 to 12.9 volts. It’s also a good idea to check and compare voltages with the battery loaded and unloaded, as some “good” battery voltages will drop well below acceptable levels when placed under load (keying a VHF radio, for example).
As for installations, all batteries must be properly secured so that movement is no greater than 1 inch in any direction. They should also be installed in liquid-tight, acid-proof boxes or trays, and all positive terminals must also be covered with a non-conductive shield to prevent accidental shorting. Installation of rubber terminal “boots” or the plastic lid of a typical battery box, will satisfy this requirement.
Electrical panel inspections
Check circuit breakers by flipping each and verifying that their respective circuits are energized. Replace breakers with a worn or loose feel during operation.
After securing all power, open and inspect the rear of each AC and DC panel for problems such as
corrosion, charred terminals, broken wires or exposed conductors. Check all breakers and fuse holders to ensure everything is tight and secure, and neaten up wiring behind the panel using wire ties or other wire management tools.
All panel connectors should be crimp-on ring terminals, preferably the type with attached heat-shrink tubing to prevent moisture entry and corrosion. Replace all electrical tape joints and household-type twist-on connectors.
Wiring
Inspect all spaces for loose, hanging wire runs, damaged conductors and chafe points, particularly where wires pass through bulkheads or other such partitions. Wiring should be supported at least every 18 inches with non-metallic supports except in the engine room, where metallic wire supports are required.
The use of solid copper wiring (such as ROMEX) is not recommended aboard. Solid wire is susceptible to breakage due to vibration, a situation that can result in arcing and possibly fire (particularly with regards to the AC system). Make sure all solid wiring is replaced with multi-stranded, marine-grade wire by a competent marine electrician.
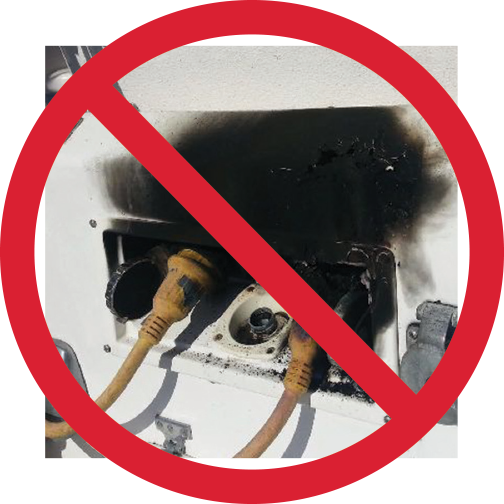
AC shore power cord
Start your inspection by turning off your boat’s main AC breaker, and then the shore pedestal breaker. Next, unplug the AC shore power cord at both ends and lay it on the dock to facilitate your inspection.
Inspect the power cord for chafe, cracks, split insulation or electrical tape repairs, any of which are grounds for replacement. Check plugs and inlets at the boat and dock for discoloration (an indication of overheating) or corrosion on or around pins and plug inlets. This should be done each time you disconnect shore power or monthly at a minimum. Verify the presence of the retaining ring, which enables you to keep the plug securely in place to prevent movement and possible arcing and sparking at the pins.
Another good practice is checking the “feel” of the connection when plugging in. Those that feel loose or don’t seem to be making firm mechanical contact likely won’t provide good electrical contact either. Avoid using worn or damaged dock pedestal plugs and report them to marina personnel as soon as possible.
NOTE: Although these checks are geared towards the average boater, always seek the advice of a competent marine electrician if needed, preferably one familiar with the standards and recommendations provided by the National Fire Prevention Association (NFPA) and the American Boat and Yacht Counsel (ABYC).

CAPT. FRANK LANIER is an award-winner journalist, boat maintenance guru and owner of Capt. F.K. Lanier & Associates, Marine Surveyors and Consultants. Check out his YouTube channel “Everything Boats with Capt. Frank Lanier.” CAPTFKLANIER.COM